Home
Kids Crafts INDEX
Animal Crafts
Holiday Crafts
Sunday School Crafts
Craft Recipes
Outdoor Crafts
Musical Instruments
Spring Crafts
Summer Crafts
Fall Crafts
Winter Crafts
Cooking With Kids
Coin Collecting
What's New Blog
Websites
Contact Us

[?] Subscribe To
This Site

XML RSS
Add to Google
Add to My Yahoo!
Add to My MSN
Add to Newsgator
Subscribe with Bloglines
 

Turtle Mosaic

Go outside on a "rock collecting mission" to find rocks and pebbles that will make this turtle's hard shell. If you would like to make a smaller version just use a dessert size paper plate.

Rate it!

Level of Difficulty: Easy

What you'll need...

• 1 Paper Plate
• Brown paint
• Green construction paper
• Black Marker
• Rocks and Pebbles
• Glue
• Scissors
• Pencil


Here's how to make it...

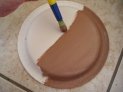
1. Paint your paper plate brown (acrylic paint was used on the pictured turtle, but washable finger paints will work as well).

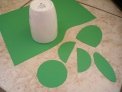
2. Using the green paper, cut out the turtle's head and tail. Using a coffee mug, trace out 2 circles and cut each circle in half to make the turtle's legs. Once the paint is dry, glue on all of your turtle's parts. Don't forget to draw on the turtle's eyes!

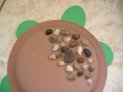
3. Make your turtle's shell strong by gluing on small rocks and pebbles.


Congratulations! You just finished your turtle, enjoy!


Email

Name

Then

Sign up for our FREE Newsletter
The Busy Bee BUZZzzz
You'll get the BUZZzzz on our new crafts, featured crafts for up coming holidays and seasons, AND learn some fun and useful tips for doing kids crafts - all delivered to your inbox from busybeekidscrafts.com.


Your email address is totally secure, it is only used to send you the Busy Bee BUZZzzz.


Click here to find more Reptile Crafts like the Turtle Mosaic.


footer for turtle mosaic page